High %CSTP in your VM. Delete snapshot failed: How to consolidate orphaned snapshots into your VM
Tue-2012-05-01 1 Comment
This blogpost is based on a real life incident. The platform is vCenter Server & ESXi 4.1 Update 2.
Please note that vSphere 5 has an improved method for this situation: KB2003638.
So what do you do when you have to do maintenance to your Exchange VM? Stop all services and make a snapshot, right? It might be a good idea to stop the VM first, because snapshotting alot of RAM will take some time. After you’ve done your change and you are satisfied it’s working properly again, you delete the snapshot.
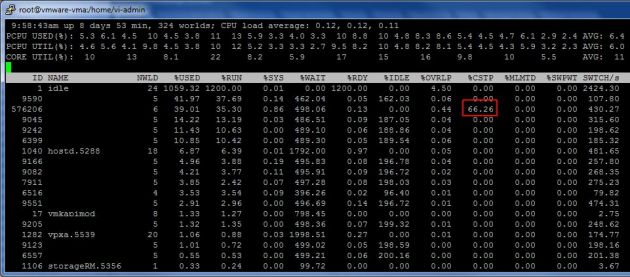
So what if you forget to delete the snapshot? Performance will become bad fairly quickly, depending on the number of users (= load). Exchange will become sluggish and esxtop will show you why:
66% CSTP. Not good. VMware made a nice KB article about it: KB2000058. Solution? Pretty simple, consolidate your snapshot.
But… What if that proces fails? In my case, the VM had high CPU load because it was running on a snapshot disk, high I/O load because a backup process was running. On top of that, I tried to delete the snapshot. When realising the backup was also running, it was immediately paused. Ofcourse, strictly speaking the 2 processes shouldn’t have any influence on each other, but the VM was really sluggish at this time. On top of that, during the consolidation process, vCenter Server lost the connection to the host. So the deletion of the snapshot timed out.
First thing to do is wait. Just because your vSphere client doesn’t report it, doesn’t mean the consolidation process has failed. The time you have to wait depends on the size of the snapshot (and the speed of your storage). In my case I waited another 20 minutes. The VM was still sluggish. I checked the hard disk location of the VM and saw it was running on <name>-00000x.vmdk files. Those are snapshot files, so I knew by then the snapshot consolidation process had really failed.
This is where it becomes interesting. You are running on snapshot files and your VM is sluggish because of that. Nothing really changes, you still have to consolidate the snapshot. But that has become impossible to do by using your vSphere client because vCenter doesn’t ‘see’ the VM has a snaphot.
The solution to this problem is fairly simple and is explained in KB 1002310: Take a (new) snapshot (from the vSphere Client preferrably). When that finished, delete all snapshots. The ‘orphaned’ snapshot files will be consolidated together with the new snapshot.
In my case, I tried the command line approach and logged into the ESXi host. I executed the command
vim-cmd vmsvc/getallvms
to get the list of VM’s. I executed the command
vim-cmd vmsvc/snapshot.get [VMID]
to get the snapshot. For some unknown reason, which is still unknown to me at this point, no snapshot info was returned. Looking back, it might have been possible the snapshot only consolidated completely at that point. Unfortunately I didn’t check at that time. It might also be very possible that corruption had already occured at this point in time. Fact of the case is, the creation of the snapshot in the following step went wrong. So there was something wrong. It bothers me that I can’t pinpoint the problem till this date.
So I tried to create a snapshot using the command
vim-cmd vmsvc/snapshot.create 3 snapshot1 snapshot 0 0
The command failed with the ever so lovely error: ‘Snapshot creation failed’. I’m not sure this was the exact error returned, but the information given was basically the same. It remined me of the legendary Windows error ‘An error has occured.
Anyway, I also check KB1008058 and I might very well did something wrong while trying to make the snapshot from the command line, because I ended up with 2 snapshot files with wrong CID ID’s in the .vmdk descriptor files. ESXi also saw the error and shutdown the VM. This was actually very good, because a shutdown is always better then writing your datablocks in the wrong data file.
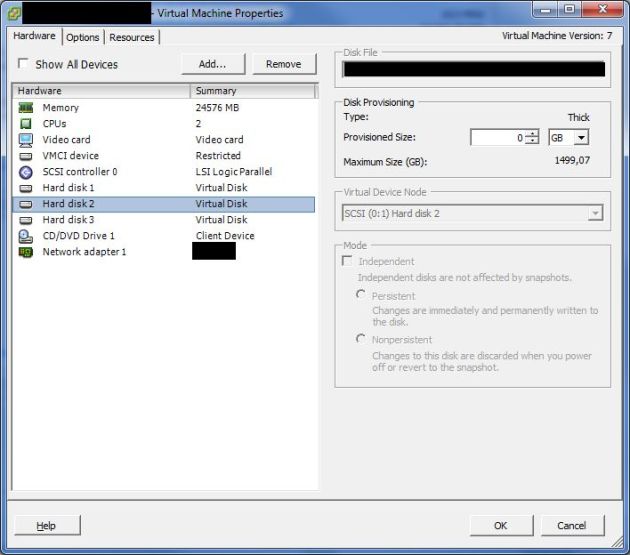
I removed the VM from the inventory and added it again. Of the 3 virtual HDD, one showed 0GB. This was the disk with the Exchange database.
I wasn’t too worried though, because I knew I still had all data. Time for some intense analysis and read up on KB1007969.
Note: The correct thing to do at this point, is to contact VMware support. They will basically do the same as I describe below, but it might be a good idea to let them do it. I only continued because I knew what the problem was and I was pretty sure I still had all my data.
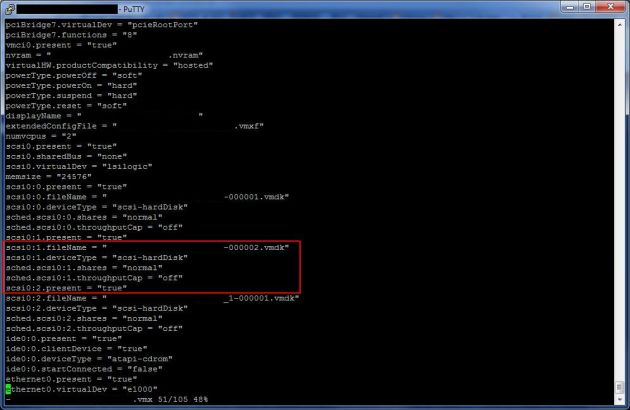
I checked the .vmx file to determine the ‘lost’ disk. It was scsi0:1, the second disk. This seemed correct. -000002.vmdk showed to be the latest snapshot file the VM was running of.
My snapshots were not correctly ‘aligned’, so I couldn’t get any reliable info from the .vmsd and vmsn files.
I had 2 snapshot files; -000002 (which was the newest snaphost and which was the snapshot the VM was running on), and -000004. Unfortunately I don’t have a screenshot of the -000002 vmdk file.
The parent disk was on another LUN. It’s vmdk file seemed OK.
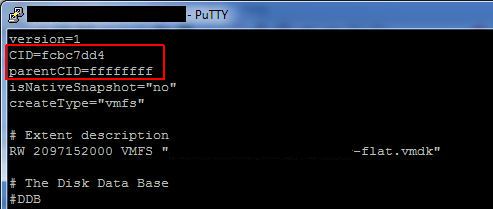
The problem was, -000002’s parentCID pointed to fcbc7dd4, and -000004 assumed CID fcbc7dd4 as you can see below.
Knowing that the CID identfiers change during boot , I was quite comfortable to change the CID (NOT the parentCID!). I changed -000004 parentCID to fcbc7dd4 and I changed -000004’s CID to 499d08dd and also changed the final 8 chars of the ddb.longContentID to 499d08dd. Basically, I swapped the ID’s. Now -000004 points to the correct parent. The path to the parent disk was already correct, so I didn’t change that.
Now I only had to point the -000002 to -000004 as parent. So I change the parentCID to 499d08dd. The path was correct. I made sure the -000002 and -000004 vmdk files listed createType as vmfsSparse and the extended description also included VMFSSPARSE.
I then removed the VM from the inventory and added it again. The disks were now all back to their original sizes. Because the mention of possible data corruption in KB1007969, we contacted VMware support.
After 1 hour Adrian White, one of VMware’s Technical Support Engineers in Ireland, assured us that data corruption was pretty unlikely (not impossible). He checked my steps above and verified they were correct.
We were now basically back to the point where there was only the problem of the orphaned snapshots files. The solution was still the same. Take a snapshot and consolidate all snapshots. This time, the vSphere client was used. Taking the snapshot only took a moment because the VM was still shutdown. Choosing the ‘Delete all’ option in the Snapshot Manager resulted in a slowly progressing progress bar, which, of course, was a good thing =)
This time around the deletion was succesful. The VM powered up and booted without any problems. There were no further incidents and the VM performed splendidly.
As of to date, there has been no report of data loss or data corruption. So inspite of loosing mail capabilities for 4 hours (1 hour waiting for VMware support), the organisation was satisfied with the performance once the mail functionality was restored. This helped alot in the acceptance of the loss of productivity.
I also want to mention KB1015180, which explains how snapshots work.


Pingback: Esxtop to the rescue !! « Cragdoo Blog Cragdoo Blog